Event Tagging
Event Tagging is a rule-based, auto-tagging system with which you can define customised tags based on incident payloads, that get automatically assigned to incidents when they are triggered.
You can define tags as key:value pairs. For example, the key could be severity and the possible values could be SEV0, SEV1, SEV2, etc., or the key could be Team and the possible values could be Backend, Frontend, Database, etc.
Event Tagging can be achieved by defining Tagging Rules for each Service in Squadcast. When these rules evaluate to true for an incoming incident, the defined tag pairs are added to it.
Prerequisites
-
The User Role associated with the user in the Team must have required permissions to manage Services (ability to manage Tagging Rules).
-
Integrate with an Alert Source and ensure that the Alert Source has started sending alerts to Squadcast before setting up Tagging Rules.
Creating Tagging Rules
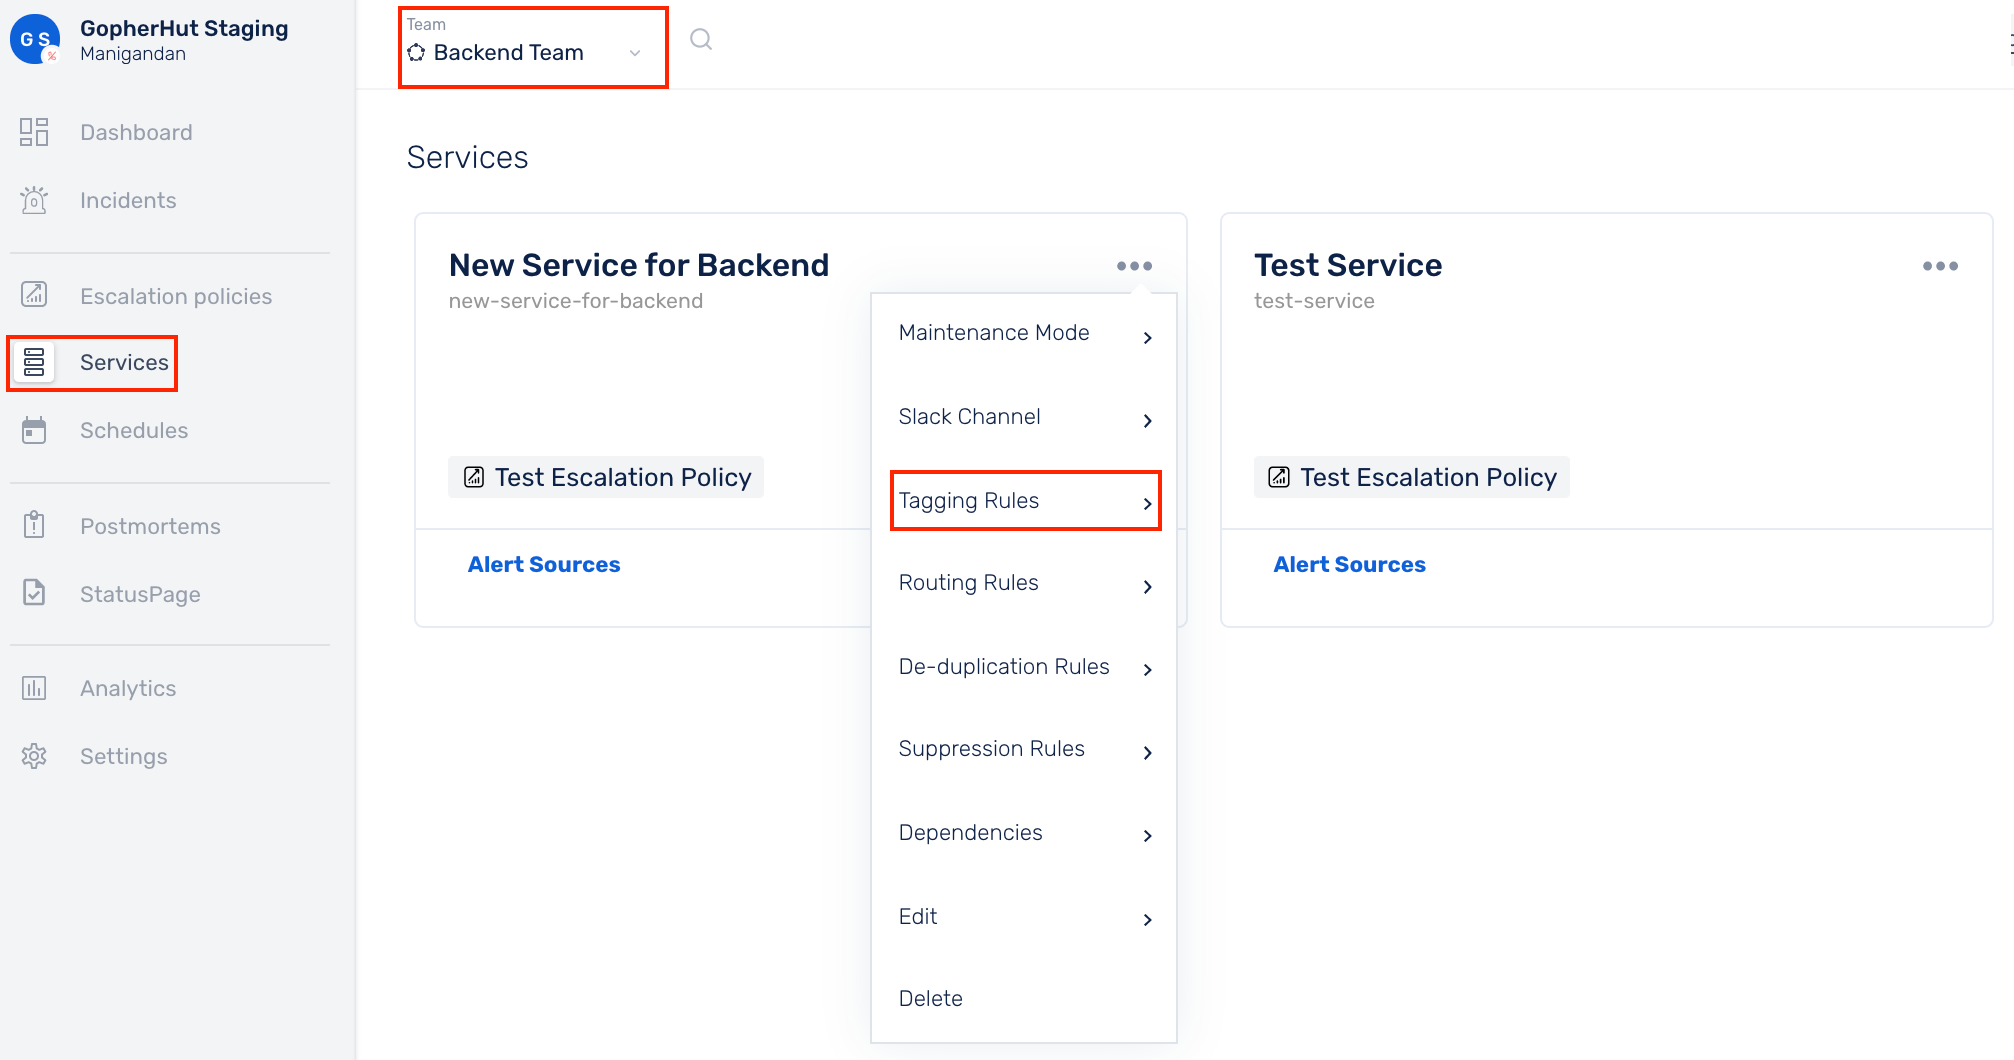
Ensure that the right Team is chosen from the team picker on the top of the screen.
(1) Click on Services in the primary navigation
(2) Select a Service and click on the More options icon
(3) Click on Tagging Rules
(4) Select an Alert Source from the drop-down
(5) Click on Add new rule

(6) Tagging Rules can be added in three ways:
(A) UI-based Rule Builder (Beginner-friendly)
(a) On the right, you can view the payload of the latest alert for the chosen Alert Source
(b) The drop-downs in the Rule Builder contain values from the payload on the right. You can use them to easily create your Tagging Rules
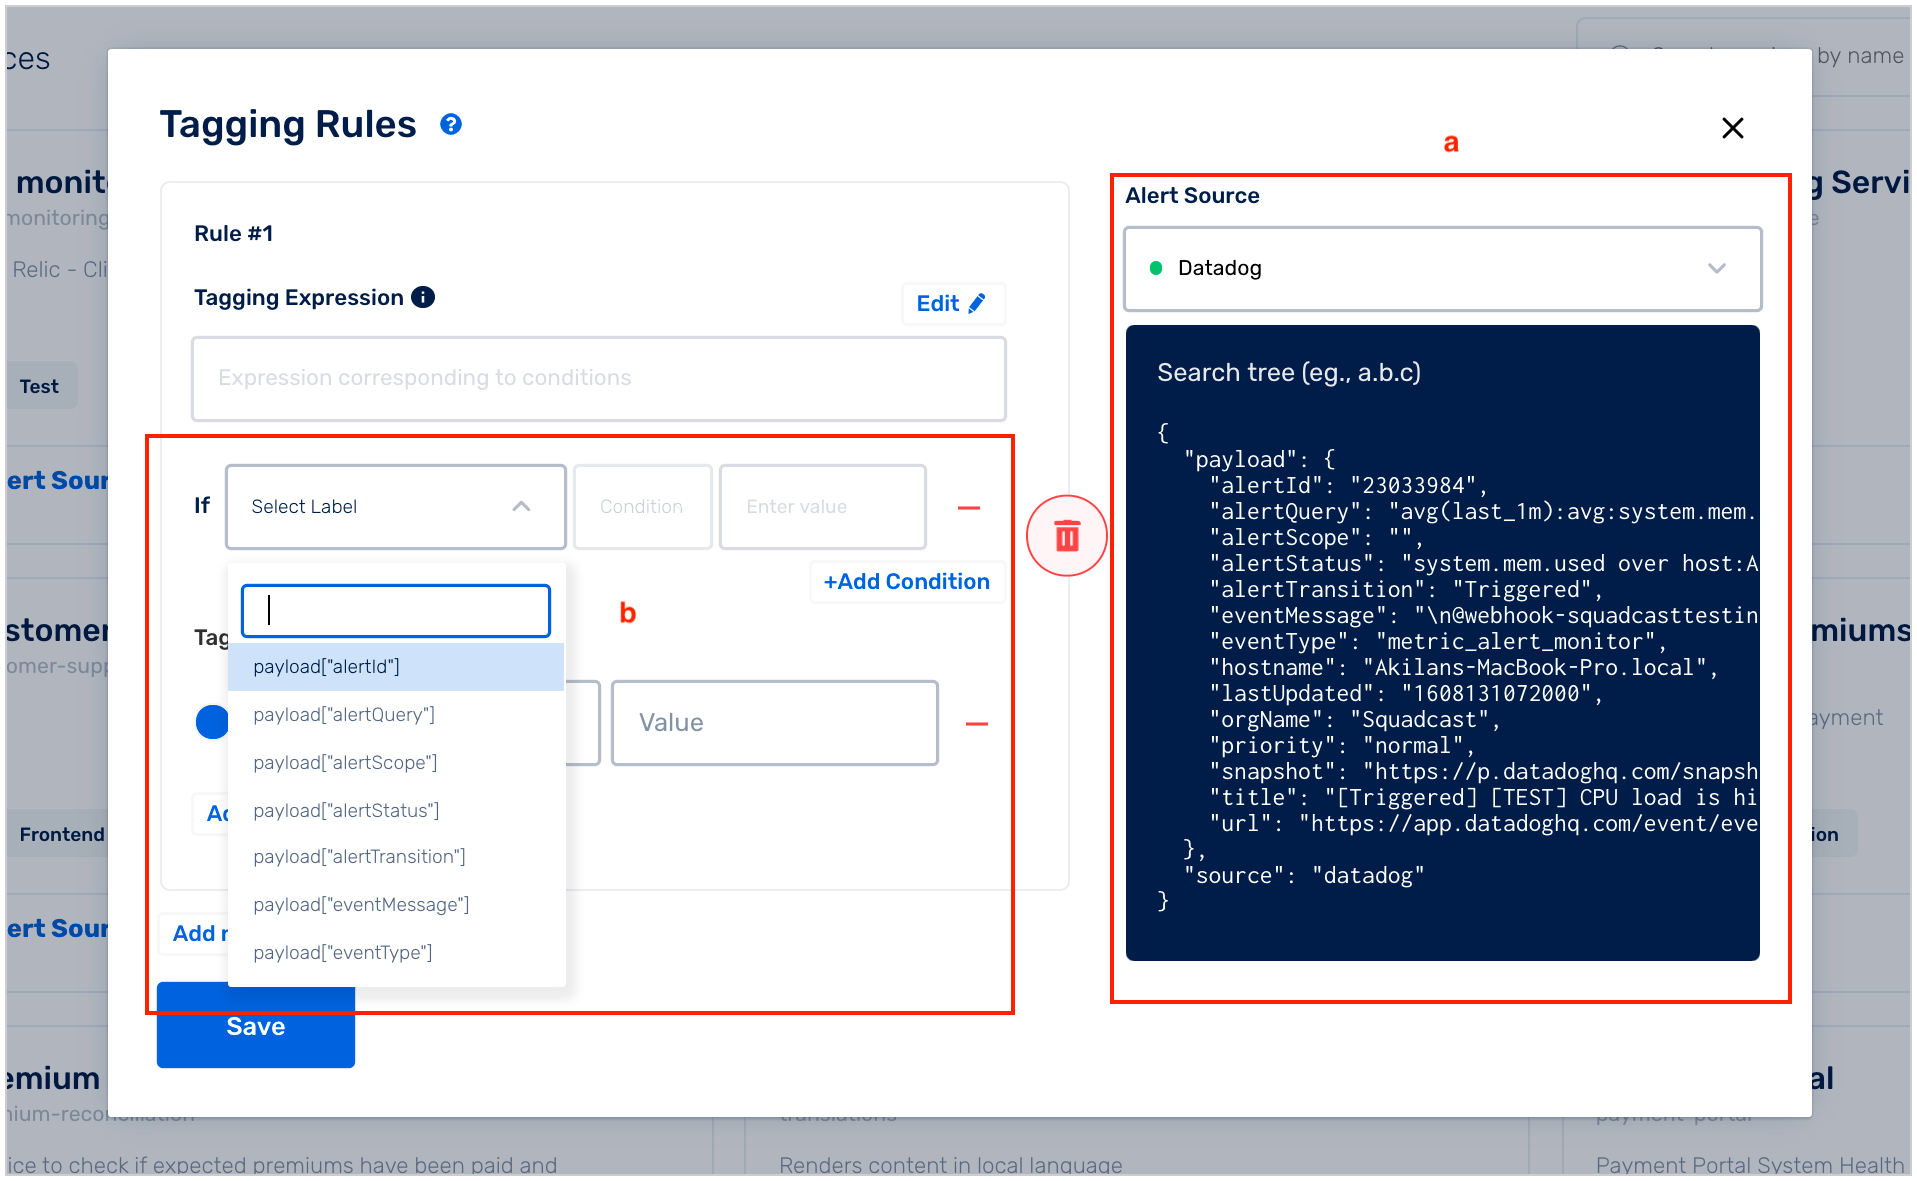
(c) You can add more than 1 condition for a rule by selecting Add Condition (a logical AND is performed between all the conditions -> the entire Tagging Rule will evaluate to True only if all the conditions evaluate to True)
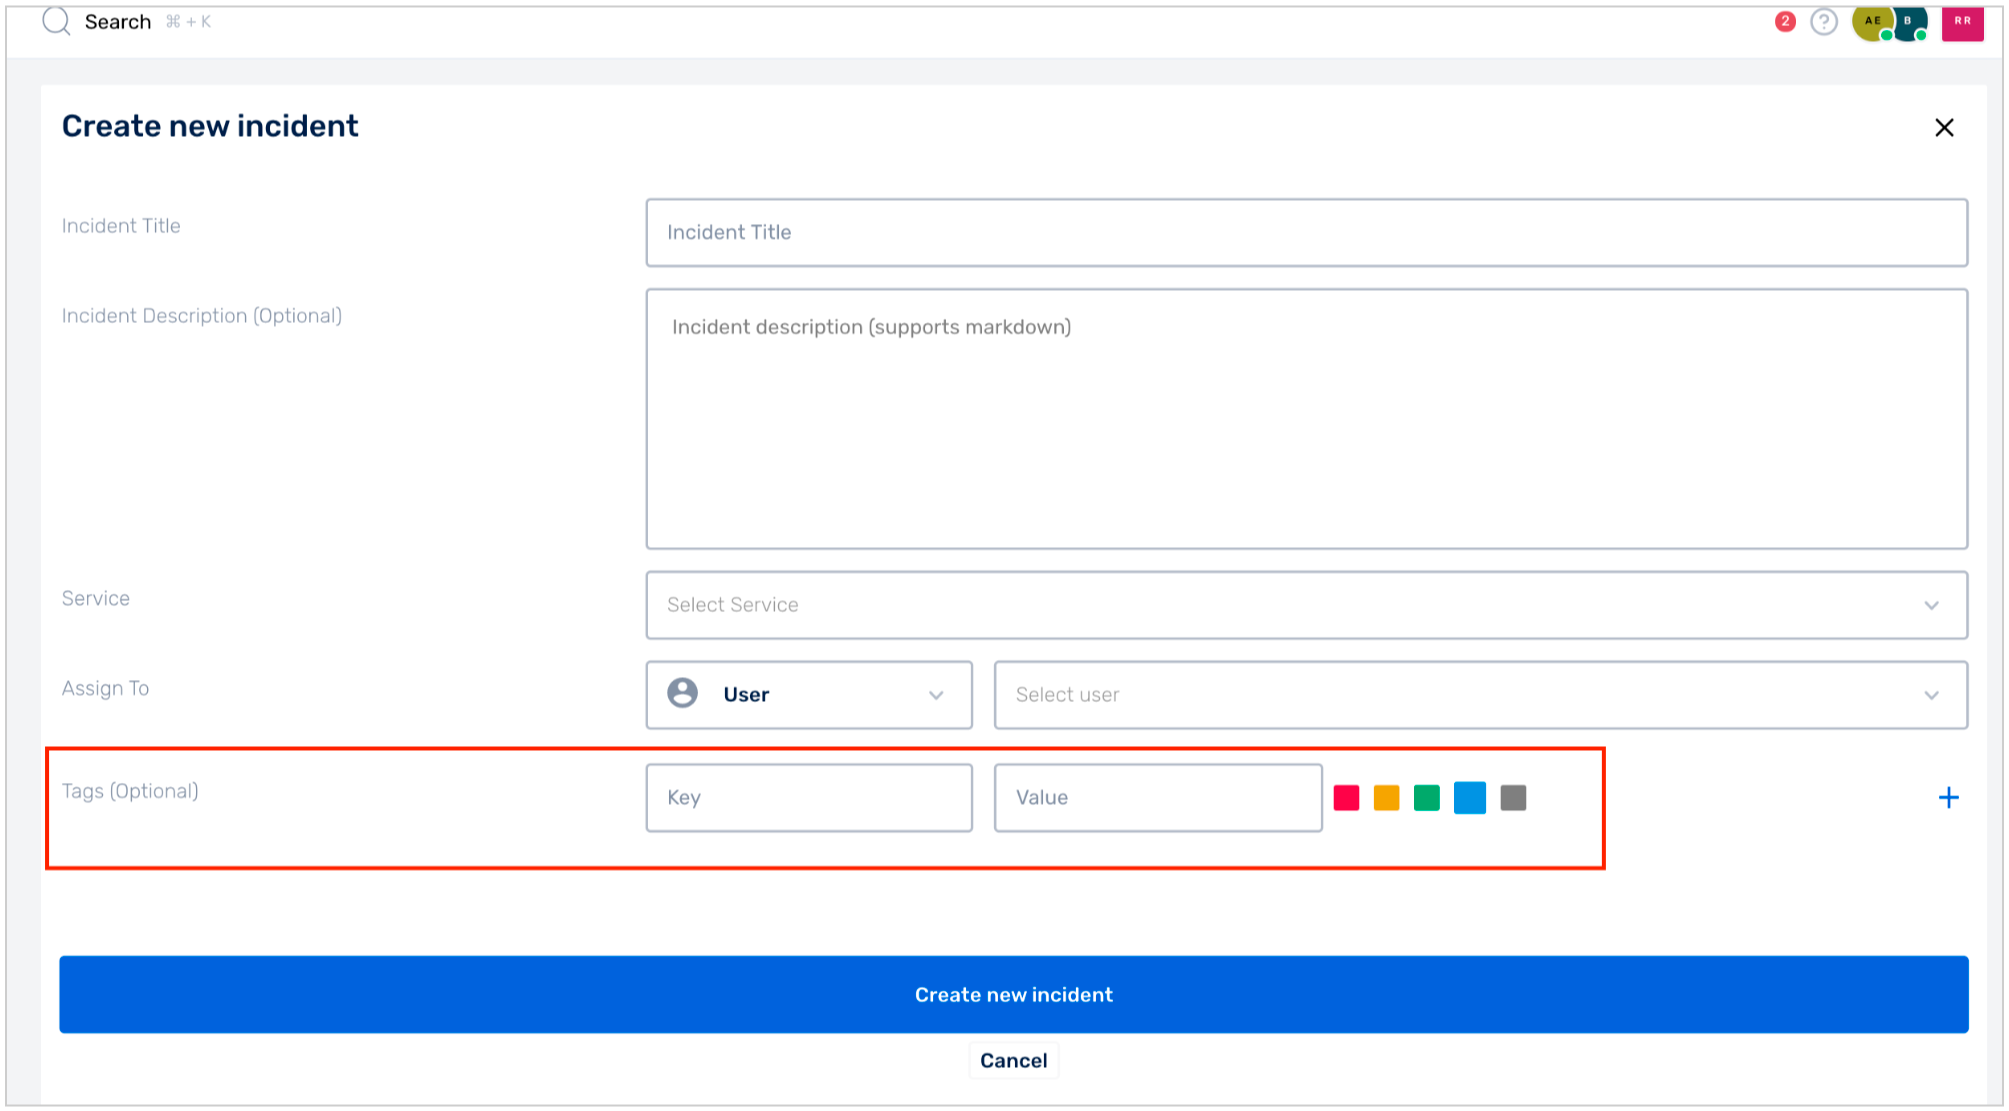
(d) Map any Key and Value pair as a tag. Multiple tags can be defined for each rule. You can select different colours for each of your tags
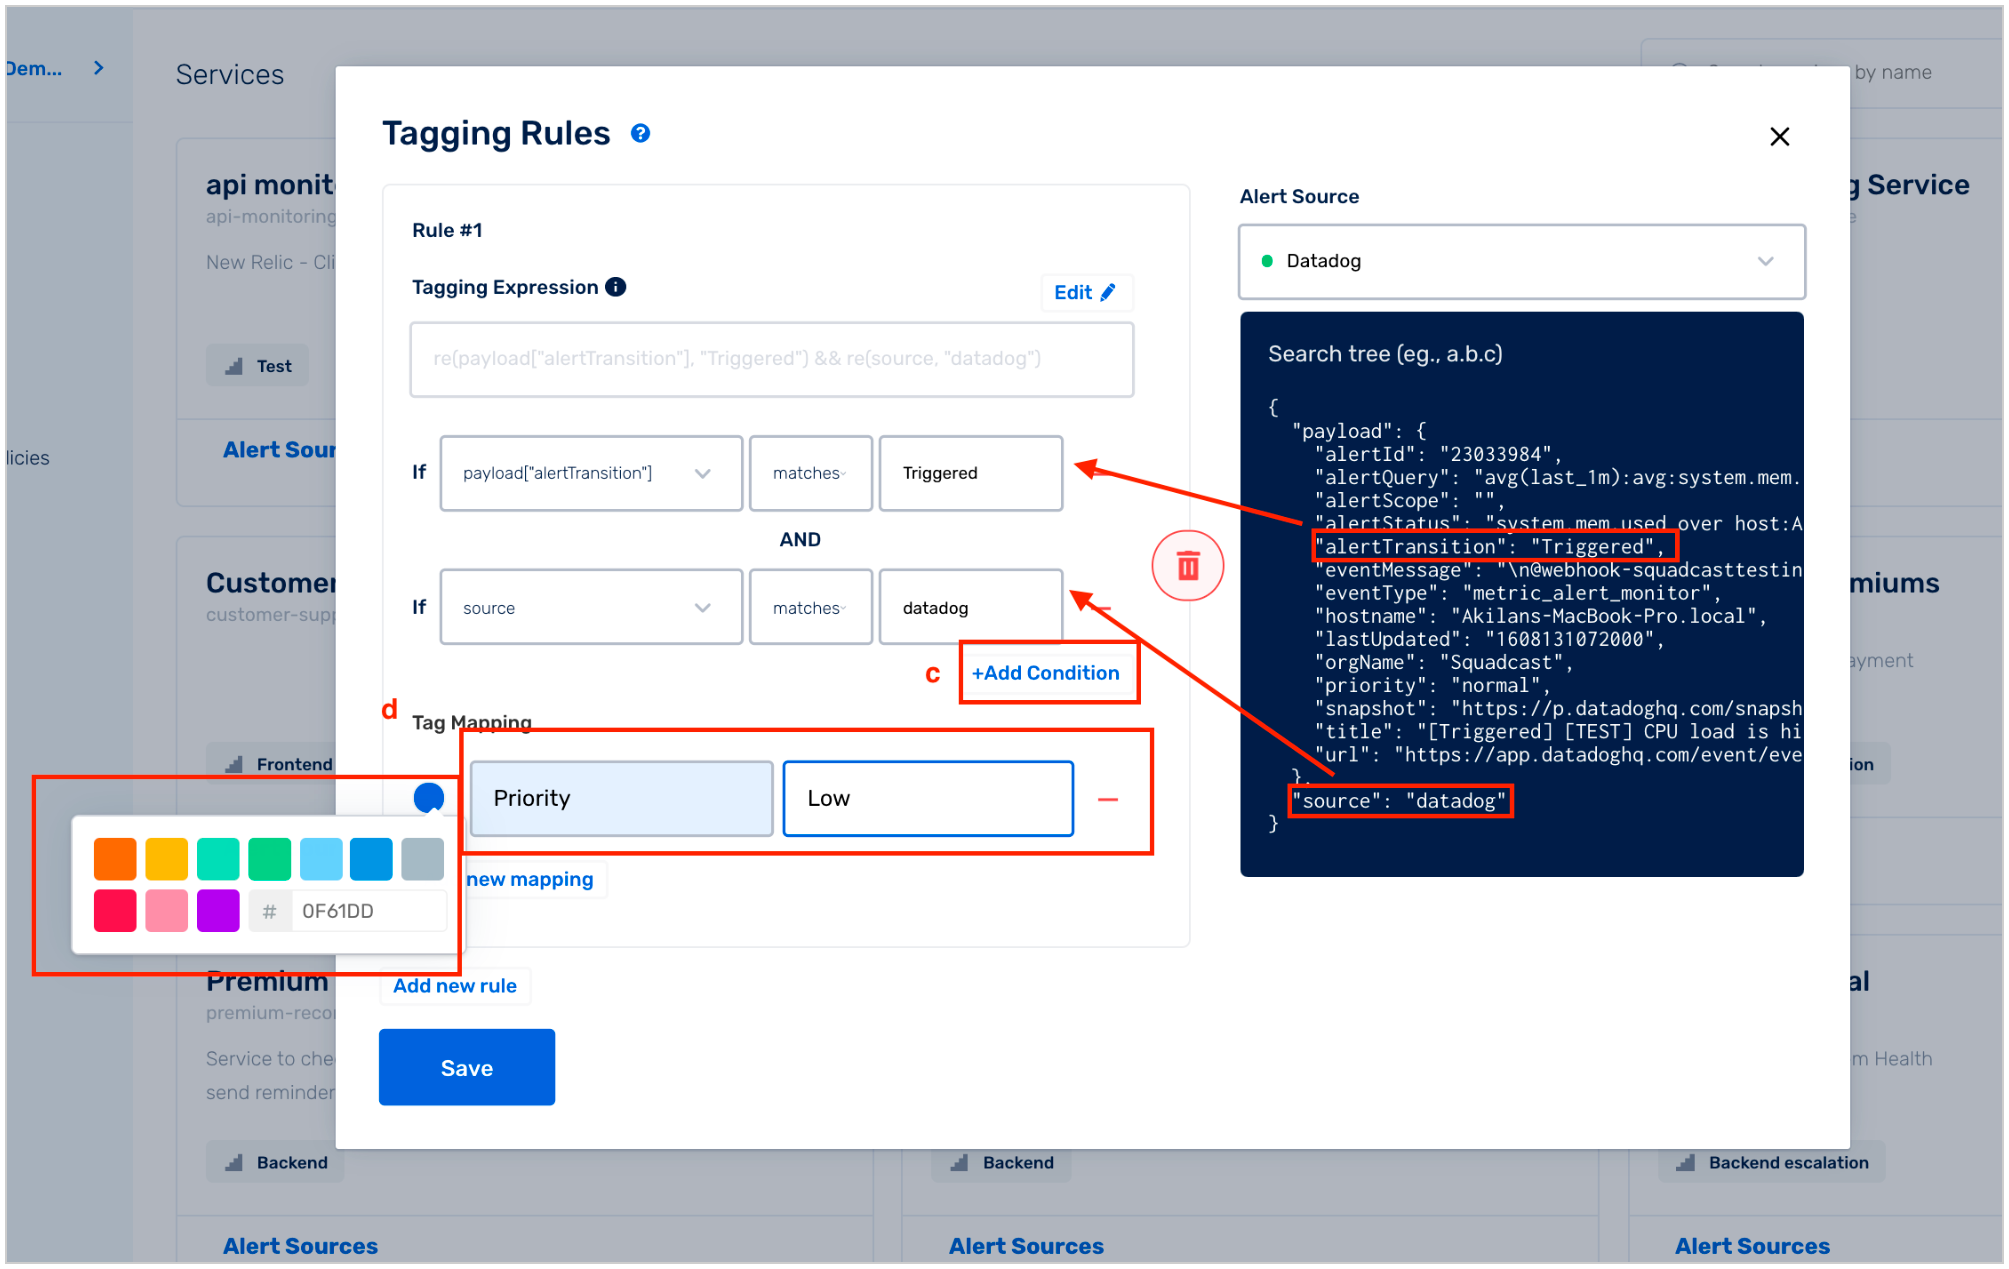
The key of the Tag label, "tag key" can only contain letters (both lowercase and uppercase) and numbers. Anything else will be ignored.
(B) Raw String Method
Once you opt for the Raw String method for a rule, you cannot revert to the UI-based Rule Builder method.
(a) On the right, you can view the payload of the latest alert for the chosen Alert Source
(b) Click on Edit to enable Raw String method
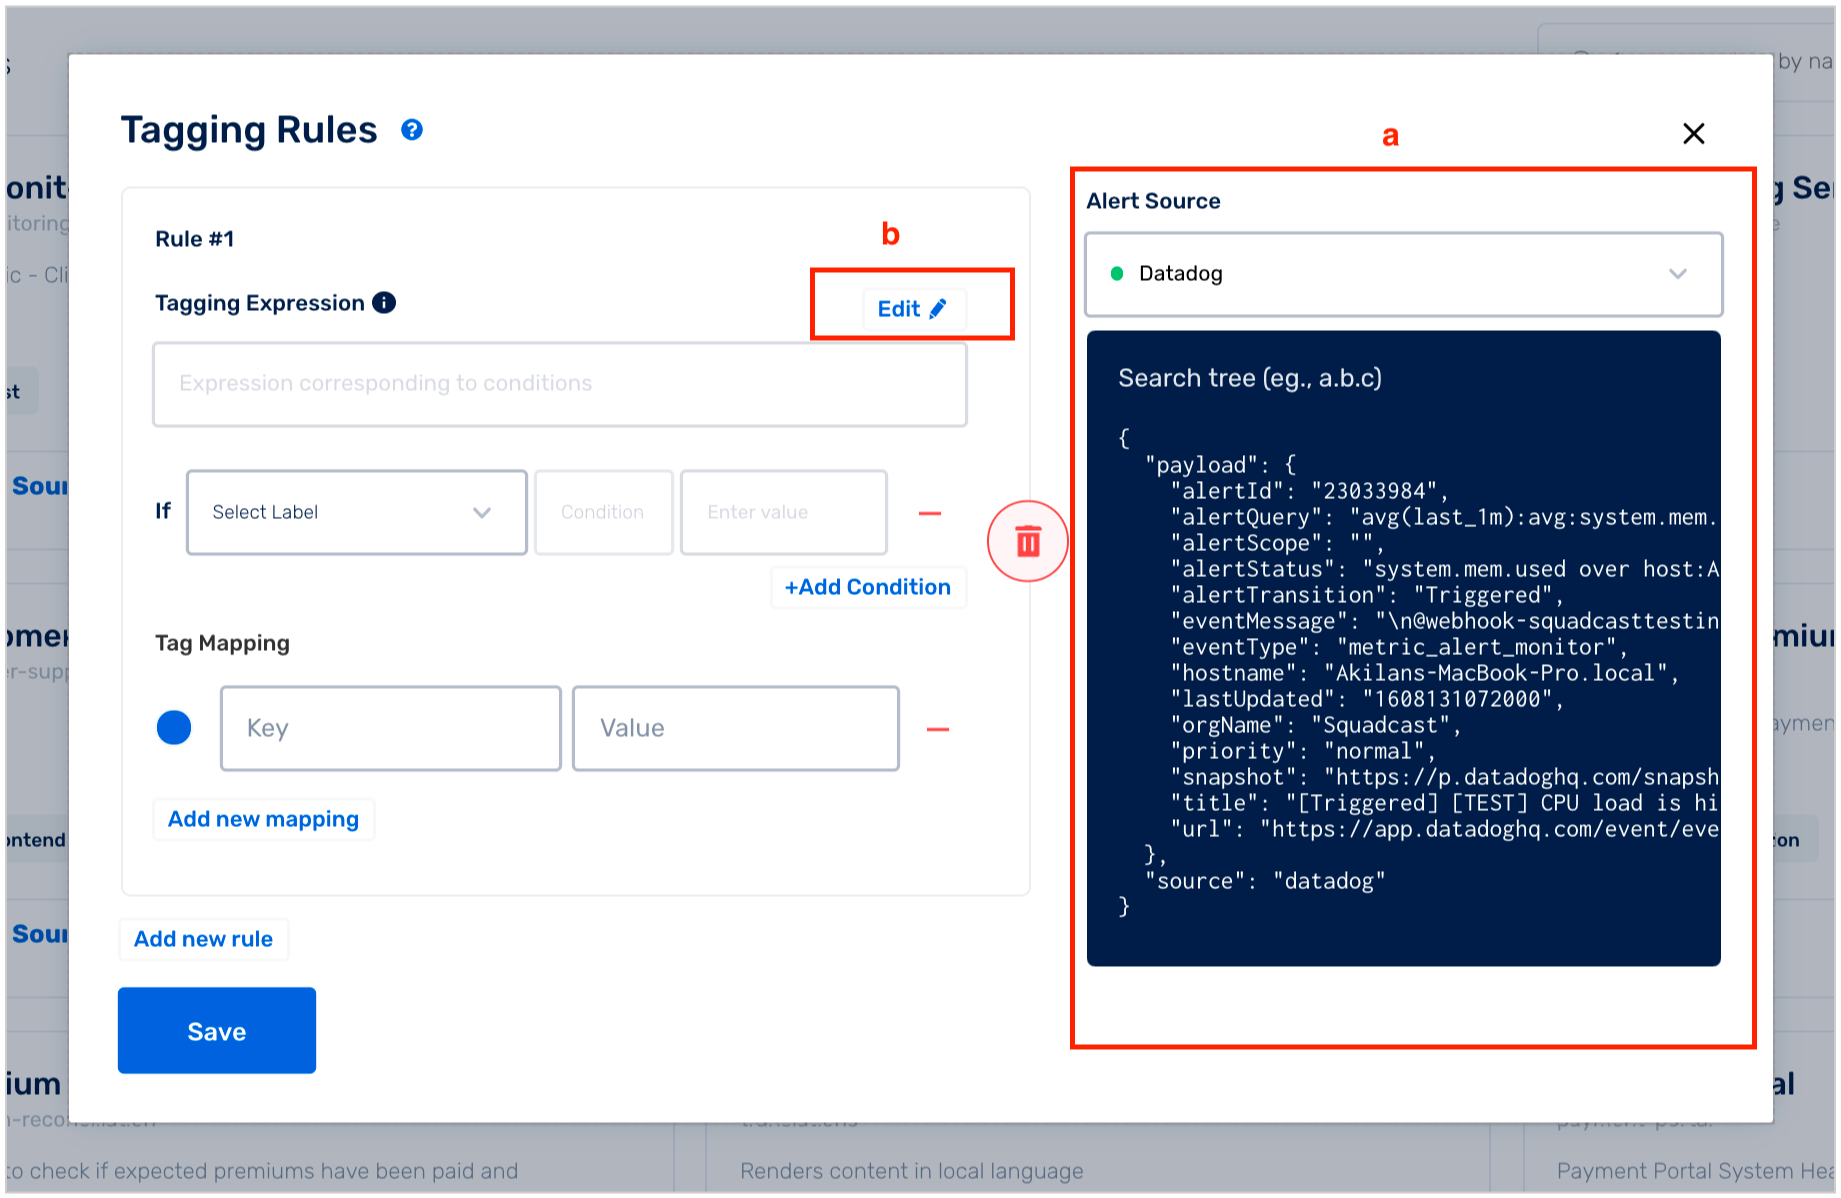
(c) Write your custom Tagging Rule expression. Below are some examples to help you get started:
Supported Rules
The rule engine supports expressions with parameters, arithmetic, logical, and string operations.
Basic Expressions
10 > 0, 1+2, 100/3
Parameterized Expressions
payload.metric == "disk"
The available parameters are payload
payload : This parameter contains the JSON payload of an incident which will be the same as the JSON payload format for the future events for a particular alert source
Regular Expressions
re(payload.metric, "disk.*")
When there are multiple Tagging Rules created, every single Tagging Rule will be evaluated. All the tags of the matching rules will be attached to the incoming incident. If you have more than 1 rule with the same "key" value in "Tag Mapping", the "value" of the tag will be that of the last matching rule’s Tag Mapping.
For example:
If you have 2 Tagging Rules for a Service:
- Rule 1 with Tag Mapping Environment:QA
- Rule 2 with Tag Mapping Environment:QA-INTER
Say, if your "match" condition string is “healthcheckstatus-QA-INTER-TESTING“, tag "Environment:QA-INTER" is created.
If you interchange the order of Rule 1 and Rule 2, tag "Environment:QA" is created instead.
Therefore, always ensure that you write your Tagging Rules in the correct order for desired behaviour or try and make them as specific as possible.
Available Predefined Commands
The below commands can be used to create Tagging Rules.
Add tags to incidents directly from your payload
- If you already have tags being carried within your incident payload, you can add them as tags to your incidents as well without having to define Tag Mappings again
- You can simply specify the values that need to be picked from the payload and added as tags to the incident (picked dynamically) rather than having to statically define these values as Tag Mappings
(A) addTag - Add one specific tag from the payload
General Format
addTag( "<tag key name>", <value that needs to be picked from payload for the key>, "#<hexadecimal equivalent colour for tag>")
- tag key: The key of the Tag label. Only letters and numbers allowed. Anything else will be ignored
- payload selector or string: You can choose to set a tag value from the payload or you can set any custom string as the tag value
- color: You can set color as a valid HEX code. This is optional. If this parameter is omitted, the default colour - #0F61DD will be used
Example Below is an example payload for demonstration:
{
   "payload": {
      “message”: “Error rates higher than usual”,
      “description”: “HTTP Error rates for srv_90 is above 90 counts/hour”,
      "severity": “critical”
   }
}
Add a tag with key:severity and its value picked dynamically from severity parameter in the payload
addTag( "severity", payload.severity, "#037916")
This will add the tag severity:critical with color #037916 to your incident.
The "addTag" function always returns a "true" value. So, this can be chained with other logical operators to set multiple tags from the payload.
(B) addTags - Add multiple tags from the payload
General Format
addTags(<object containing key-value pairs that should be added as tags from the payload>)
Example Below is an example payload for demonstration:
{
   "payload": {
	   “message”: “Error rates higher than usual”,
      “description”: “HTTP Error rates for srv_90 is above 90 counts/hour”,
	   “tags” : {
         “severity”: “high”,
         “impact_level”: "5",
         “classification”: {
            “color”: “#FF0000”,
            “value”: “backend”
         }
 	   }
   }
}
Add all the tags contained within tags object in the payload
addTags(payload.tags)
This will add the tags severity:high with default color #0F61DD, impact_level:5 with default color #0F61DD, classification:backend with the color #FF0000 to your incident.
The "addTags" function will add all the tags with the default colour only - #0F61DD.
The UI-based Rule Builder method does not support any function calls like "addTag" and "addTags". In order to use them, you would have to opt for constructing the tagging expression in the Raw String method.
Parse JSON content within the payload using jsonPath to add a tag
General Format
jsonPath(<the JSON string that should be parsed for JSON content>, <"the parameter that needs to be picked from the parsed JSON object">)
Example Below is an example payload:
{
   "payload": {
      "Type" : "Notification",
      "MessageId" : "5966c484-5b37-58df",
      "TopicArn" : "arn:aws:sns:us-east-1:51:Test",
      "Message" : "{\"AlarmName\":\"Squadcast Testing - Ignore\",\"AlarmDescription\":\"Created from EC2 Console\"}"
   }
}
jsonPath(payload.Message, "AlarmName")
This will pick out the value AlarmName from the Message object in the payload. To add this extracted value as a tag to an incident, use it within regex or addTag commands.
Parse HTML content within the payload using htmlUnescape to add a tag
General Format
htmlUnescape(<the string that is encoded with HTML escape sequences>)
Example Below is an example payload:
{
   "payload": {
      "id": "Memory available alert",
      "message": "Memory available alert from Chronograf for Test Macbook Pro",
      "details": "{"Name":"mem","TaskName":"chronograf-v1-07cb04d0-f1f5-4a3f-afce-68ebb2b05d44","Group":"nil","Tags":{"host":"Test-Macbook-Pro.local"},"ServerInfo":{"Hostname":"localhost","ClusterID":"5359c160-521e-4a16-615efb7460cb","ServerID":"47f1c611-85cf-bc42702fd259"},"ID":"Memory available alert","Fields":{"value":23.566293716430664},"Level":"CRITICAL","Time":"2020-12-22T12:22:20Z","Duration":20000000000,"Message":""}\n",
      "time": "2020-12-22T12:22:20Z"
   }
}
htmlUnescape(payload.details)
This will parse HTML content details object from the payload. See the following section to know how this can incorporated within a Tagging Rule.
Incorporating multiple commands in a single rule
Example 1 Below is an example payload:
{
   "payload": {
      "id": "Memory available alert",
      "message": "Memory available alert from Chronograf for Test Macbook Pro",
      "details": "{"Name":"mem","TaskName":"chronograf-v1-07cb04d0","Group":"nil","Tags":{"host":"Test-Macbook-Pro.local"},"ServerInfo":{"Hostname":"localhost","ClusterID":"5359c160-521e-4a16-615efb7460cb","ServerID":"47f1c611-85cf-bc42702fd259"},"ID":"Memory available alert","Fields":{"value":23.566293716430664},"Level":"CRITICAL","Time":"2020-12-22T12:22:20Z","Duration":20000000000,"Message":""}\n",
      "time": "2020-12-22T12:22:20Z",
      "source": "kapacitor"
   }
}
To add TaskName as a tag from the payload coming in from Kapacitor:
source == "kapacitor" && addTag("taskName", jsonPath(htmlUnescape(payload.details), "TaskName"), "#272822")
Example 2 Below is an example payload:
{
  "payload": {
    "issue_description": "bug - 2",
    "issue_id": "10029",
    "issue_key": "HYD-30",
    "issue_labels": [],
    "issue_link": "http://13.233.254.18:8080/browse/HYD/issues/HYD-30",
    "issue_priority": "Medium",
    "issue_summary": "bug - 2",
    "issue_type": "Bug",
    "project_id": "10000",
    "project_key": "HYD",
    "project_name": "hydra"
  },
  "source": "jira-plugin"
}
Assuming a case where disk usage events need to be prioritised:
- When the disk usage is greater than 90% -
criticalandstatetag isalerting - When the disk usage is between 60 - 90% -
high - When the disk usage is less than 60% -
low
Create 3 rules with the following configuration
Rules
-
Critical:
payload.value > 90 && jsonPath(payload.tags, "state") == "alerting" -
High:
payload.value > 60 && payload.value < 90 -
Low:
payload.value < 60
(C) Manual Method
Associate a tag while creating an incident manually from the Incident Dashboard
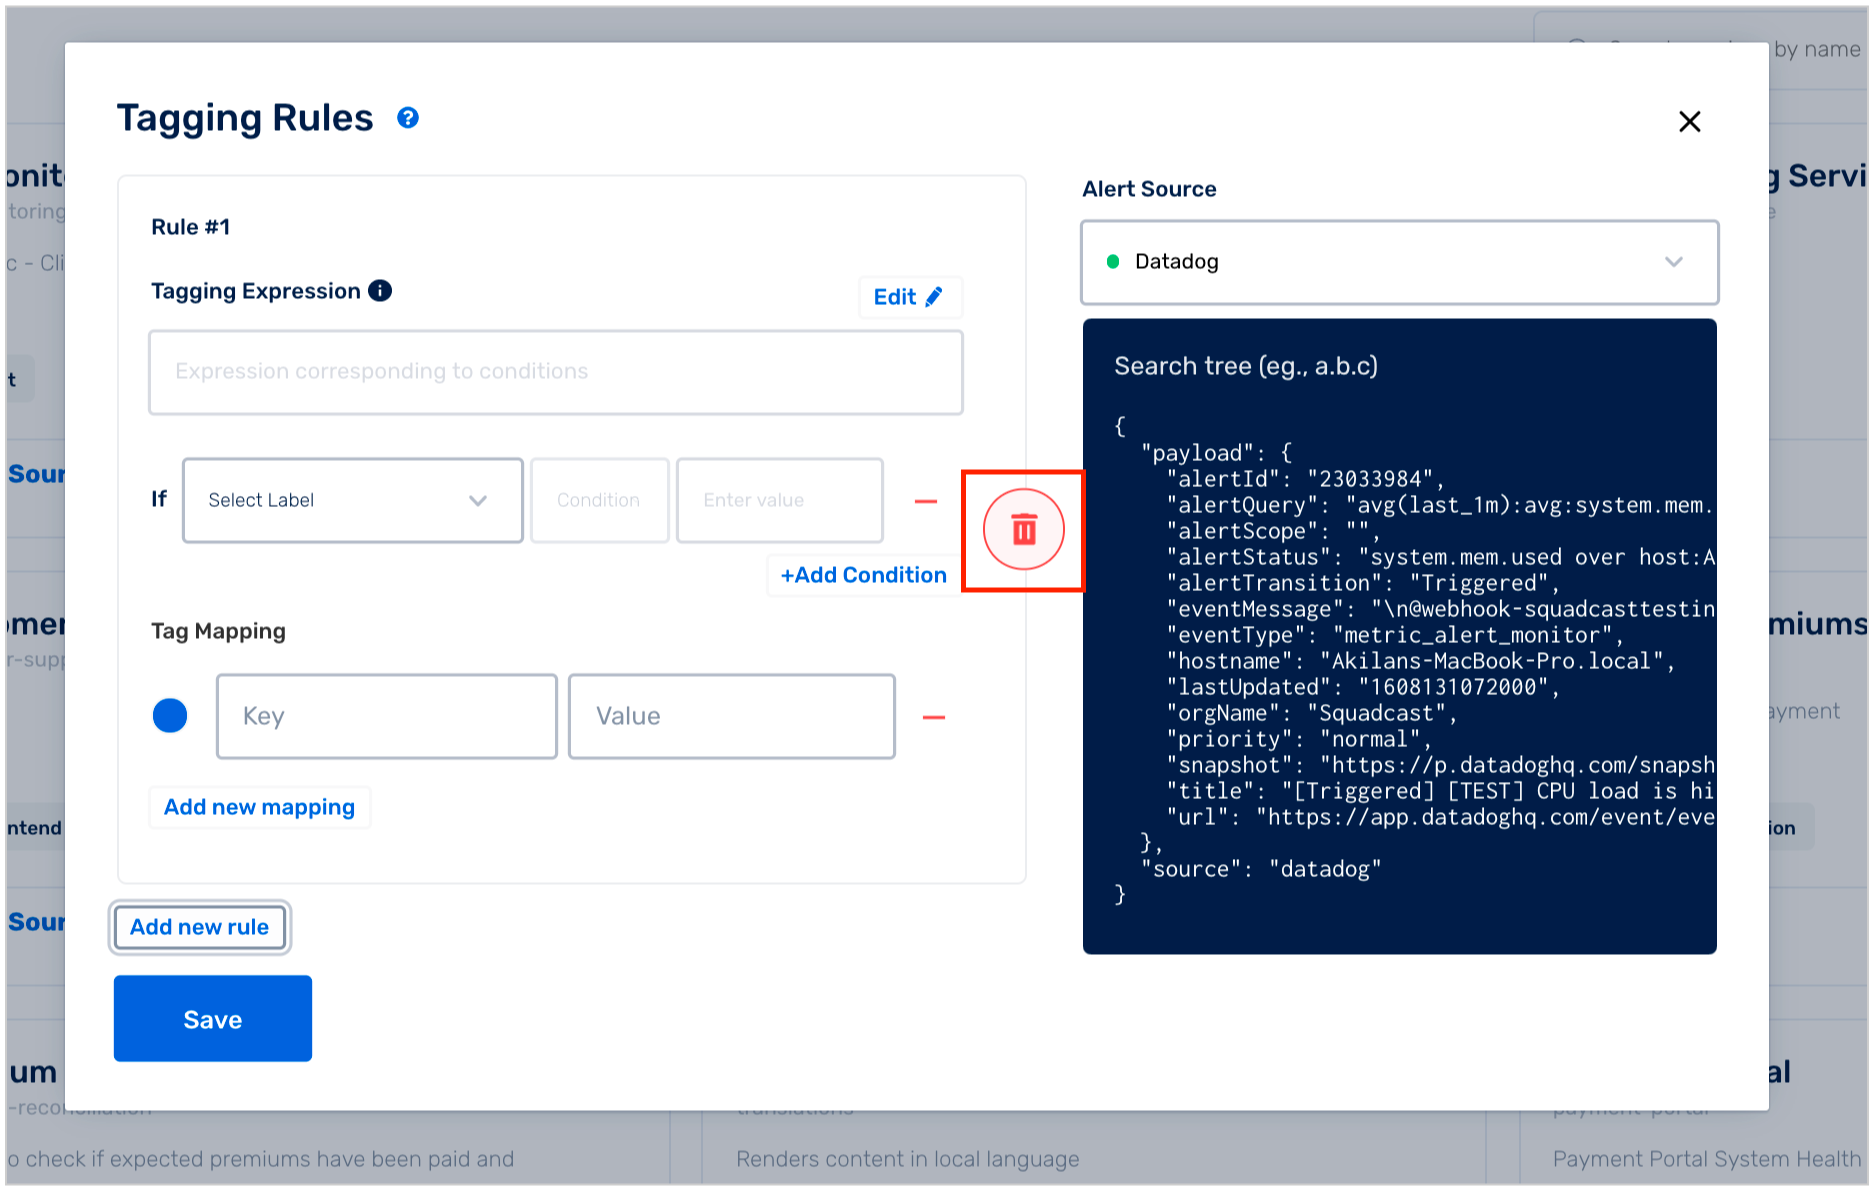
Deleting Tagging Rules
(1) Click on the Tagging Rule for a selected Service
(2) Click on the Bin icon to delete that rule and click on Save
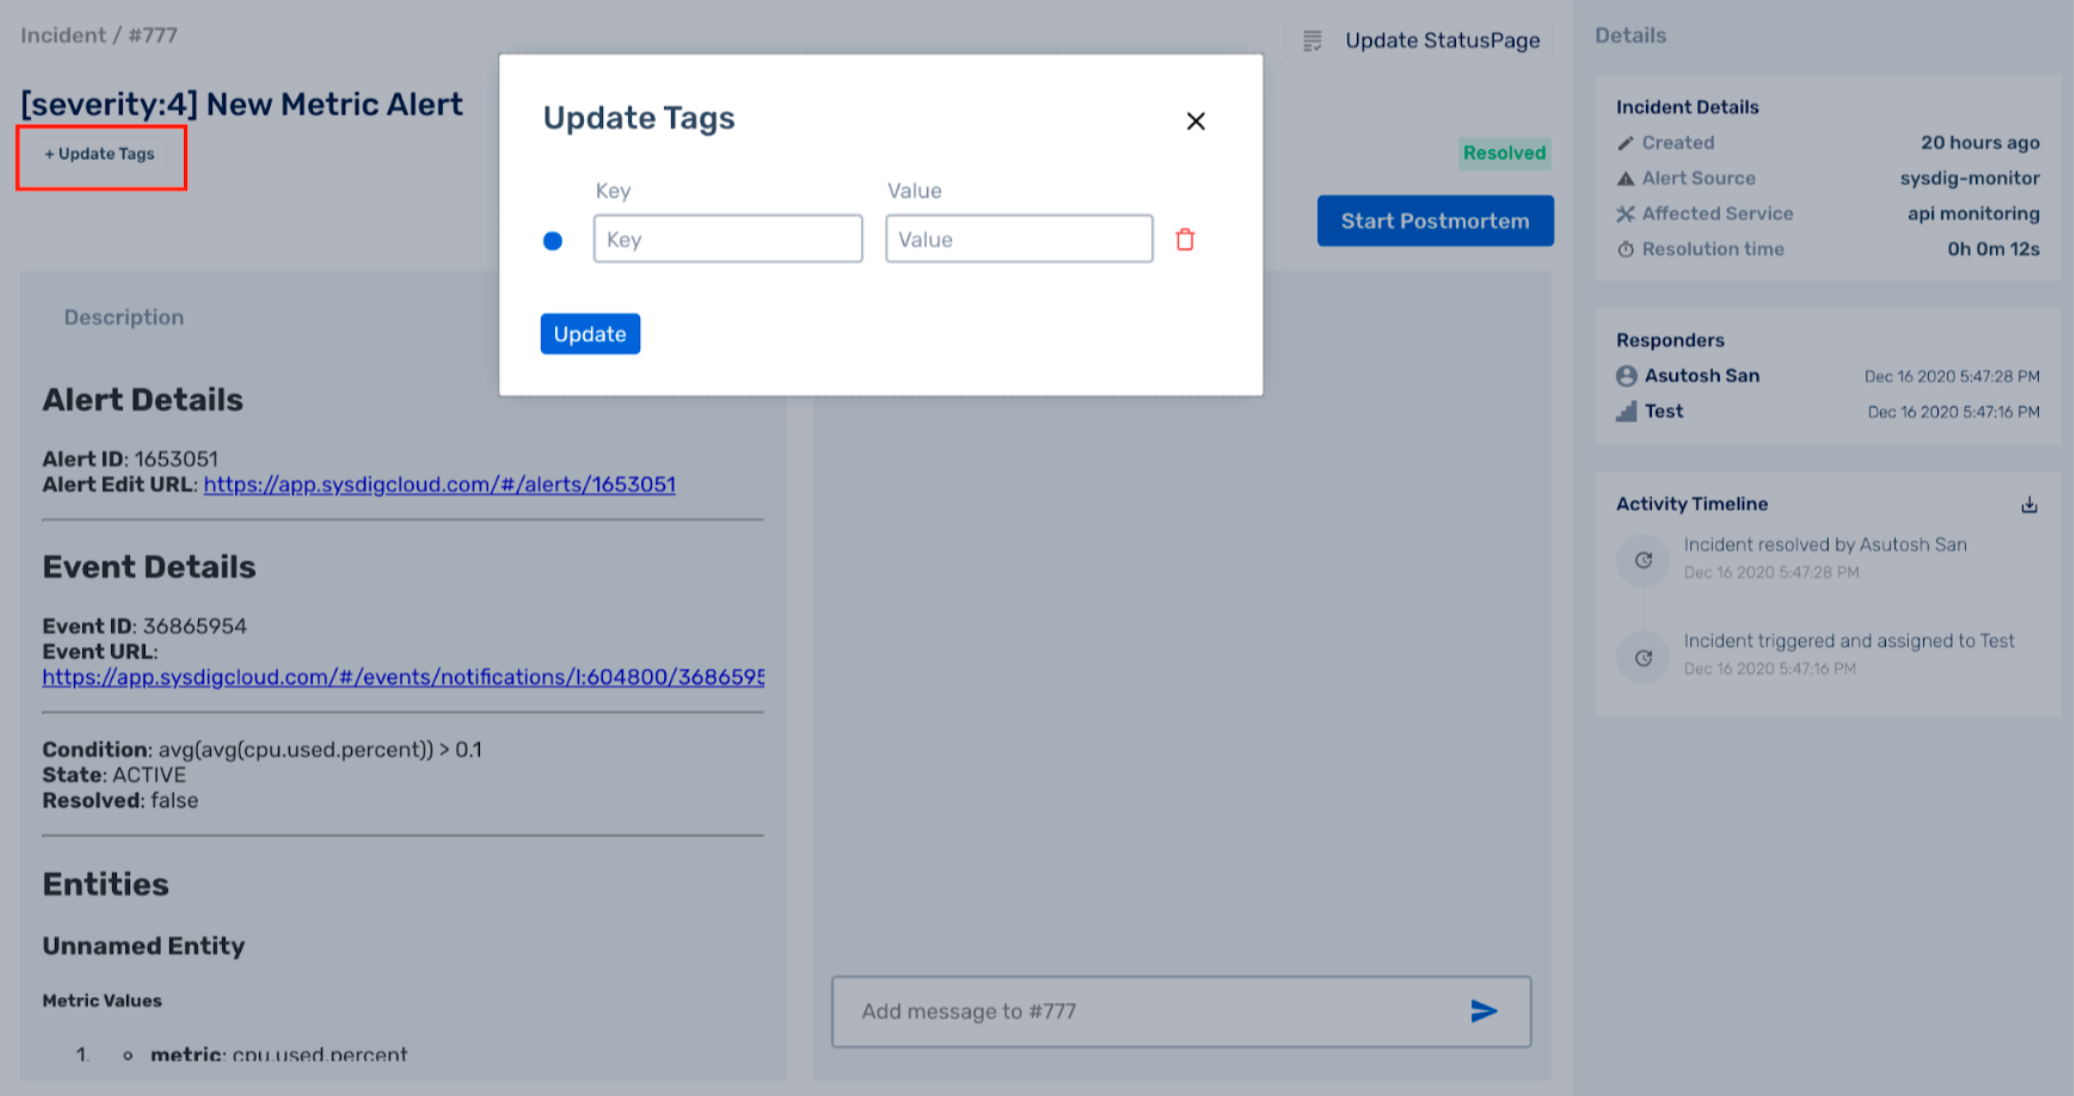
Updating Tags
Use +Update Tags within an incident to update tags for a specific incident
FAQs
(1) Where can I see the tags associated with incidents?
You will be able to clearly view tags associated with incidents in the Incident List.
(2) Can I add tags from the payload automatically?
Yes, you can. Refer here for more information and examples.
(3) Can I create OR rules?
Yes, you can. The evaluation between different Tagging Rules is OR. Add multiple Tagging Rules to enable OR evaluation.
(4) Can a Tagging Rule be created for a specific alert source?
By default, any rule added for a Service will be executed for all its active alert source integrations. You can choose to isolate Tagging Rules for specific alert sources based on the source field in the payload visible on the right panel.
Example:
source == "api" && (<your_tagging_rule>)
This will ensure that this Tagging Rule will only be active for incidents triggered via that alert source for the service. This rule will not function for any other alert source.
(5) While adding a Tagging Rule, is the search string in the rule case sensitive?
Yes, that is correct. For example, if your seach string is “ALERT” and your payload does not contain “ALERT” but contains “Alert”, this will not be matched. Your search string should be “Alert”.
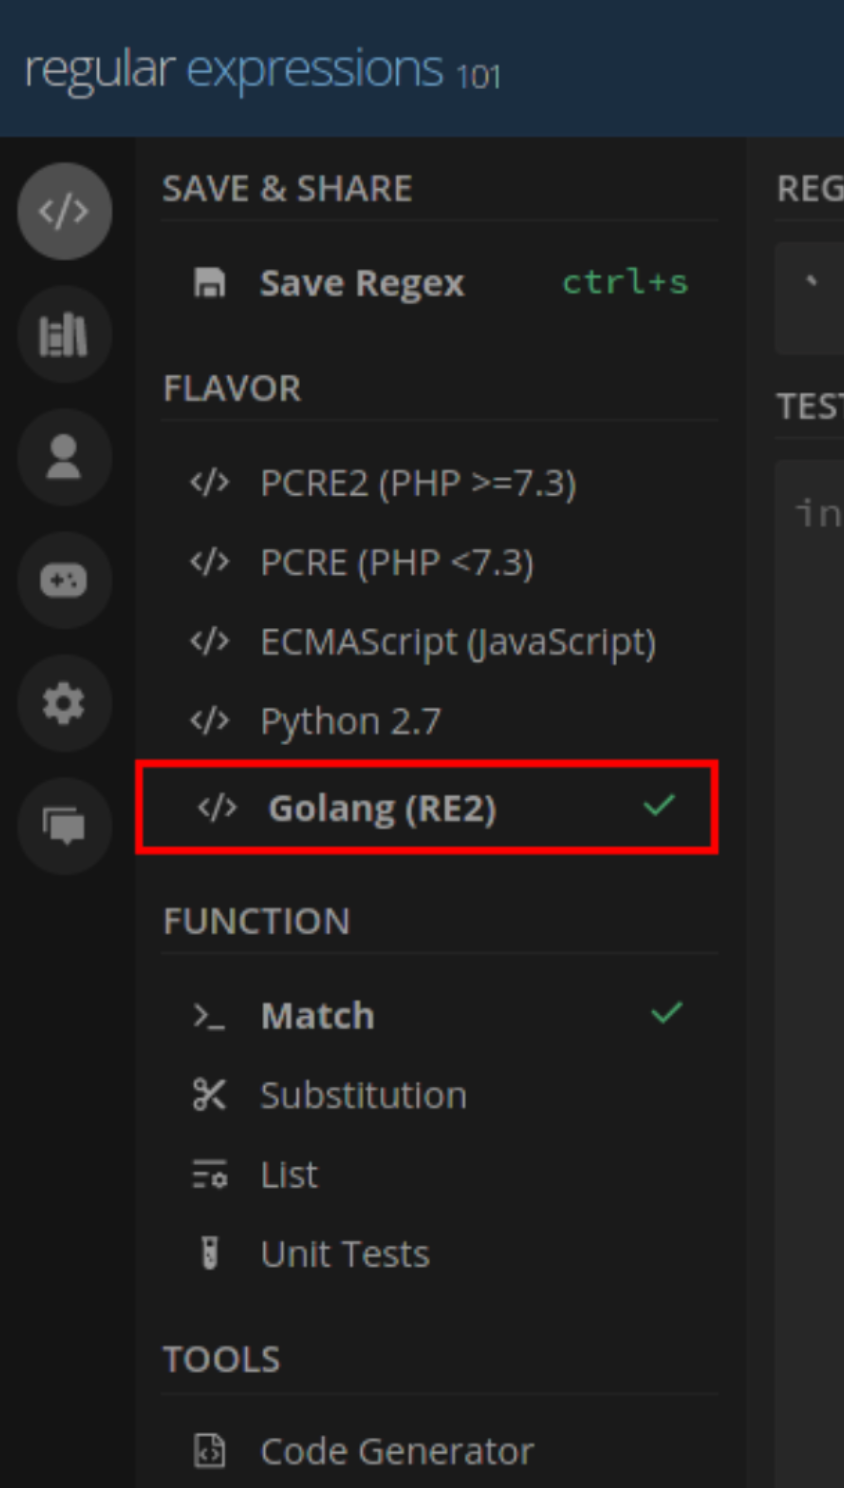
(6) What kind of regex can be used to write custom rules?
The rule engine supports expressions with parameters, arithmetic, logical, and string operations. You can also check this out to get an idea of all the expression types accepted in Squadcast. Please do your regex here against Golang flavour as shown in the screenshot below and then, set them up in Squadcast:
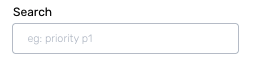
(7) I have configured multiple rules for a particular Service. Can I search through the configured rules to find the rule I am looking for?
Yes, that is doable. You will notice a Search option on the left-top of the rules modal. You can type in a word you recall from the rule itself or search by the mapped tags within the rules. Any matching results will yield the narrowed down set of rules.